


Brake Rotor Installation
- Match the new Brake Performance Rotors to the ones being replaced to insure proper size and fit.
- Be sure to replace all brake disks on the same axle.
- Inspect calipers, sliders and mounting surfaces. Lubricate all metal to metal contact areas with a lubricant called "Moly Lube".
- Make sure that the seating surfaces on brake disk and wheel hub are clean, free of rust and burrs.
- Installing old brake pads on new rotors can cause squeaking and damage to the new rotors. Always install new brake Pads.
- Actuate brake pedal several times.
Wheel Lug Torquing
- Proper installation requires you use a Torque Wrench and tighten to the specifications of your vehicle.
- Vehicle Specifications can be found from your vehicle's shop manual or vehicle/dealer provider.
- Threads must be clean and free of dirt and grit etc
- A thread chaser or tap should be used to remove any burrs or obstructions of the threads allowing the lug hardware to be turned by hand until it meets the wheel's lug seal.
- Once lugs are snugged down, finish tightening them with an accurate torque wrench.
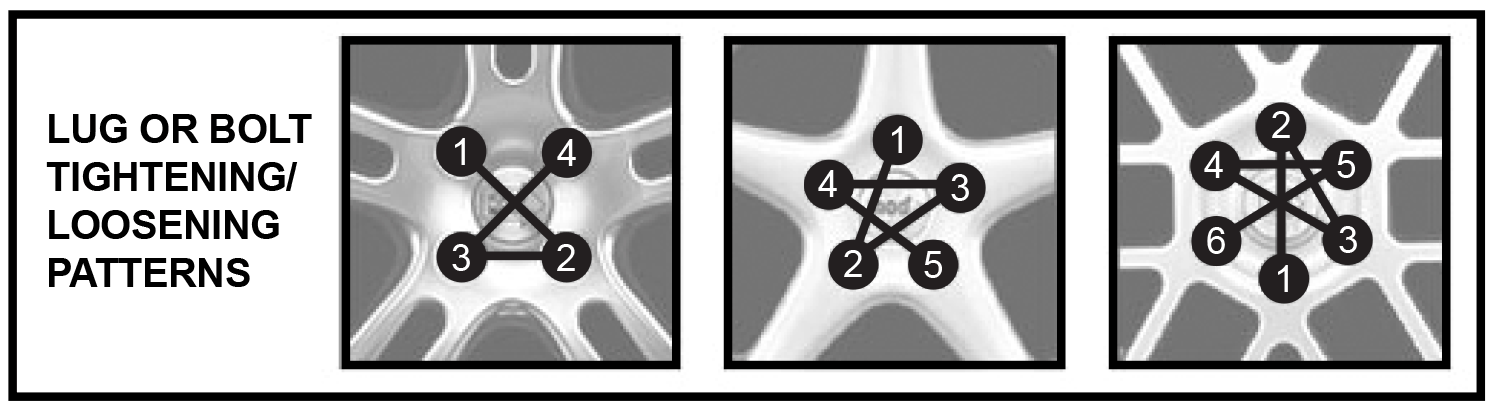
- Use the crisscross sequence (shown below) until all have reached their proper torque value.
- When installing new wheels, you should re-torque the wheel lugs after driving the first 50 to 100 miles
NOTE: Over torquing or not using a torque wrench can strip a lug, stretch or break a stud or bolt, and cause your rotors to warp. This will negate your warranty!
Important: As brake rotors are a part of the brake system and such represents safety parts, all respective work must be executed with utmost care. Inappropriate work may lead to total failure of the brake system.
Brake-In Procedure
- After installing rotors and pads, start braking procedure by applying brakes from 45mph to 5mph without coming to a complete stop and repeat 10 to 20 times. Drive 2-3 blocks then park and allow rotors and pads to cool to the touch. If pad squeaking occurs, repeat braking procedure.
- This procedure allows the material to transfer from the pad to the rotor surface
- Avoid excessive or high speed braking for 50 to 100 miles.
- Braking performance and effectiveness will be severely reduced if rotors and pads are not properly installed.
Pad Noise and Squeaking
- This occurs if the brake-in procedure is not followed.
- If existing brake rotors are not turned or cleaned to eliminate the old pad residue.
- If the incorrect type of brake pads were ordered for a specific type of vehicle.
Warning: Do not use any cleaning solutions of any kind on Zinc Plated Brake Rotors because this will cause a chemical reaction which will remove the Zinc Coating. Brake Performance will not re-plate or replace any Brake Rotors due to the damage caused by the use of cleaning solutions on Zinc Plated Brake Rotors.
Proper Installation
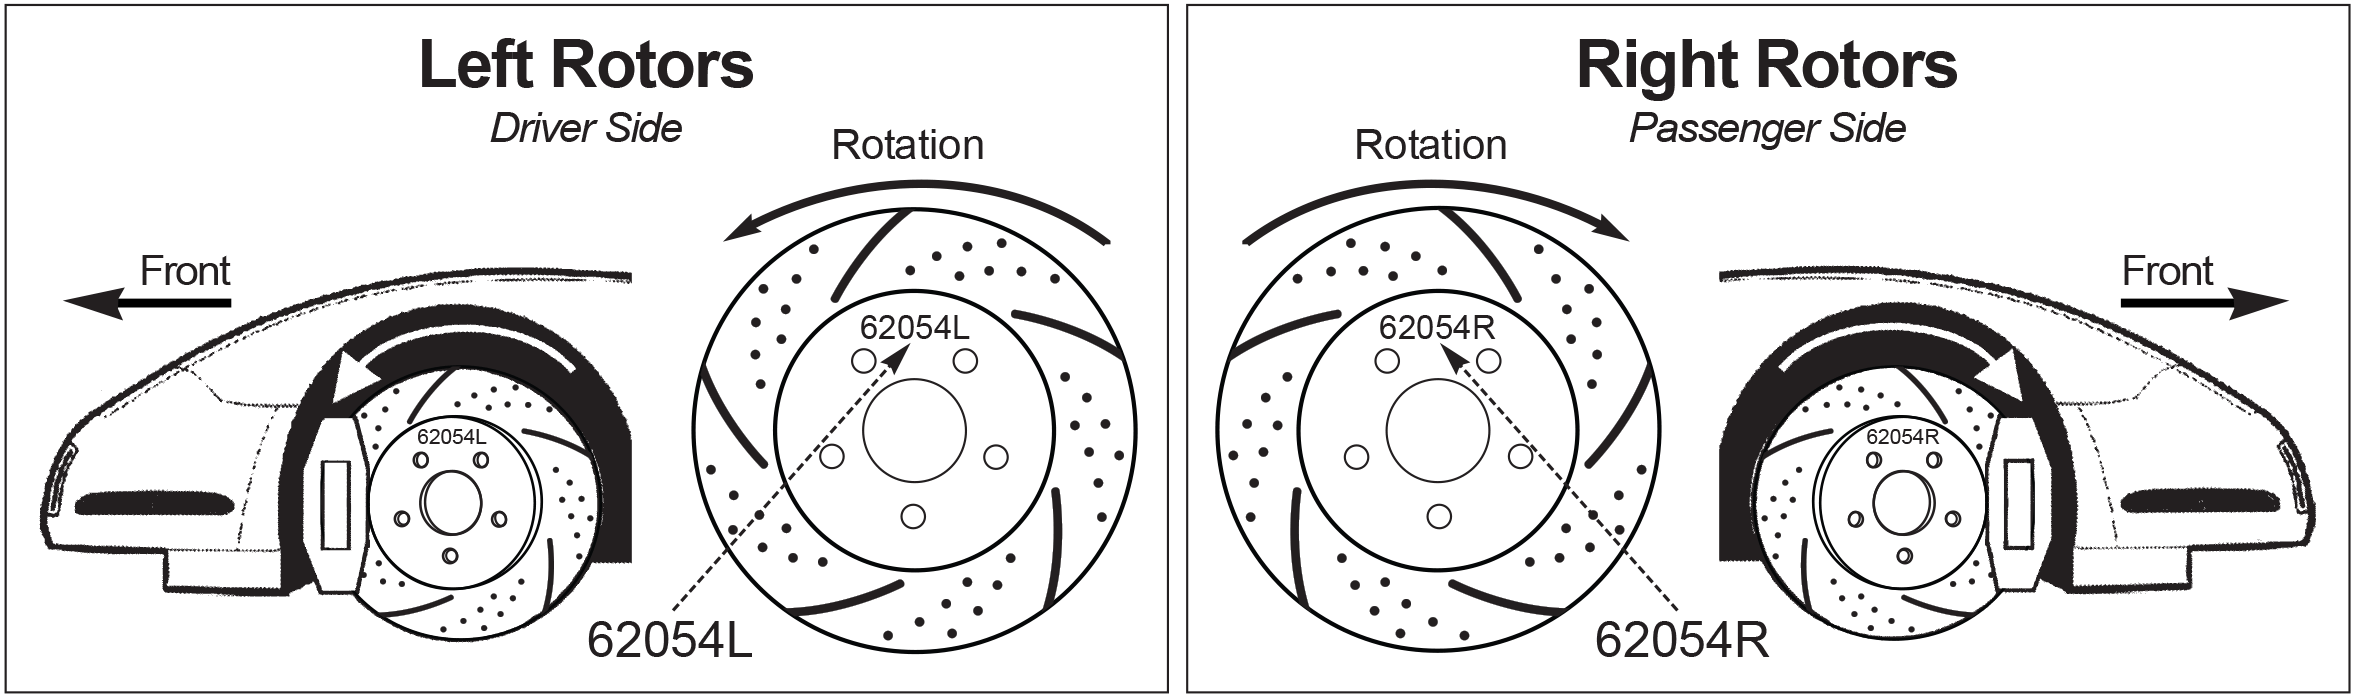
Brake Performance Rotors are machined with a directional pattern. Each Rotors is marked with the part number followed by an "L" or "R" on the outer face of the hat. The "L" indicates driver side and the "R" indicates the passenger side
BrakePerformance.com will not be liable for any loss, damage, cost or expense, including without limitation any incidental or consequential damages of any kind, including those arising from personal injury, property damage or lost profits, whether based upon breach of warranty or contract, negligence or strict product or other tort liability, arising directly or indirectly in connection with the design, manufacture, sale, use or repair of the products (either separately or in combination with any other product or material) or from any other cause, other than for the cost of replacement of the product covered in this warranty. In no event will BrakePerformance.com be liable to purchaser for more than the purchase price of the product.


|

|

|

|

|

|